Table of Contents
Introduction: Why Choose Artificial Grass?
Artificial grass has surged in popularity across the UK in recent years, and for good reason. It offers a fantastic alternative to natural lawns, particularly for those seeking a low-maintenance garden solution. No more mowing, watering, or dealing with muddy patches! An artificial lawn provides a consistently green, lush appearance throughout the year, regardless of the weather. Beyond aesthetics, the cost savings on lawn care (mowers, water bills, fertiliser) can be substantial. Furthermore, modern artificial grasses are often designed to be pet-friendly, with excellent drainage and easy cleaning capabilities. The convenience and cosmetic benefits have made it a favoured choice for families, pet owners, and anyone looking to improve their outdoor space without the ongoing upkeep of a traditional lawn.
Planning Your Artificial Lawn
Before you even think about laying artificial grass, careful planning is crucial. Start by accurately measuring your garden area. For irregularly shaped spaces, break it down into smaller, manageable sections (rectangles and triangles) and calculate the area of each. This will determine the amount of artificial grass needed, always adding 5-10% for cuts and wastage.
Next, choose the right type of artificial grass. Key factors to consider:
- Pile Height: Lower pile heights (20-25mm) are ideal for high-traffic areas and look more manicured. Higher pile heights (30-40mm) feel softer and more luxurious.
- Density: A higher density provides a more realistic look and feel, and better durability.
- Colour: Opt for a natural-looking colour blend. Avoid overly bright or artificial-looking shades.
Drainage requirements are paramount in the UK climate. Ensure your sub-base allows for adequate water runoff to prevent waterlogging. Consider the level of foot traffic the lawn will experience – children playing, pets running, or frequent use for entertaining. This will influence your choice of grass and sub-base preparation.
Tools and Materials Checklist
Having everything on hand before you start will make the process much smoother. Here’s a comprehensive list:
- Tools:
- Spirit Level
- Tape Measure
- Utility Knife (with plenty of spare blades)
- Wheelbarrow
- Compactor Plate (Can be hired – VonHaus Compactor Plate – £149.99)
- Rubber Mallet
- Joining Tape
- Adhesive (Everbuild 828 Turf Adhesive – 300ml – £9.99)
- Artificial Grass Brushes (Wilko Artificial Grass Brushes – £12.99)
- Garden Kneeler (Spear & Jackson Garden Kneeler – £24.99)
- Materials:
- Artificial Grass (see comparison below)
- Weed Membrane
- Sub-Base (MOT Type 1 – Kingfisher MOT Type 1 Sub Base – £55.00 per tonne (delivery extra))
- Sharp Sand
Step 1: Ground Preparation – The Foundation for Success
This is the most important step! Poor preparation will lead to problems down the line. Begin by clearing the area of all existing turf, stones, roots, and debris. Remove the turf using a turf cutter or spade. Dig down to a depth of approximately 75-100mm (3-4 inches). Ensure the area is completely level. Use a spirit level to check for any dips or bumps.
Next, install weed membrane across the entire excavated area. Overlap the edges by at least 150mm (6 inches) to prevent weeds from growing through. Secure the membrane with landscape staples. Finally, start building up the sub-base.
Step 2: Laying the Sub-Base and Sharp Sand
Spread the MOT Type 1 sub-base evenly across the weed membrane to a depth of approximately 50-75mm (2-3 inches). Use a rake to distribute it evenly. This sub-base provides essential drainage and support.
Now, compact the MOT Type 1 thoroughly using a compactor plate. This is crucial for creating a stable and level base. Make multiple passes over the area.
Once compacted, spread and level sharp sand over the MOT Type 1 to a depth of 25-50mm (1-2 inches). This creates a smooth, even surface for the artificial grass. Again, use a rake and spirit level to ensure a perfectly level finish. Compact the sharp sand lightly.
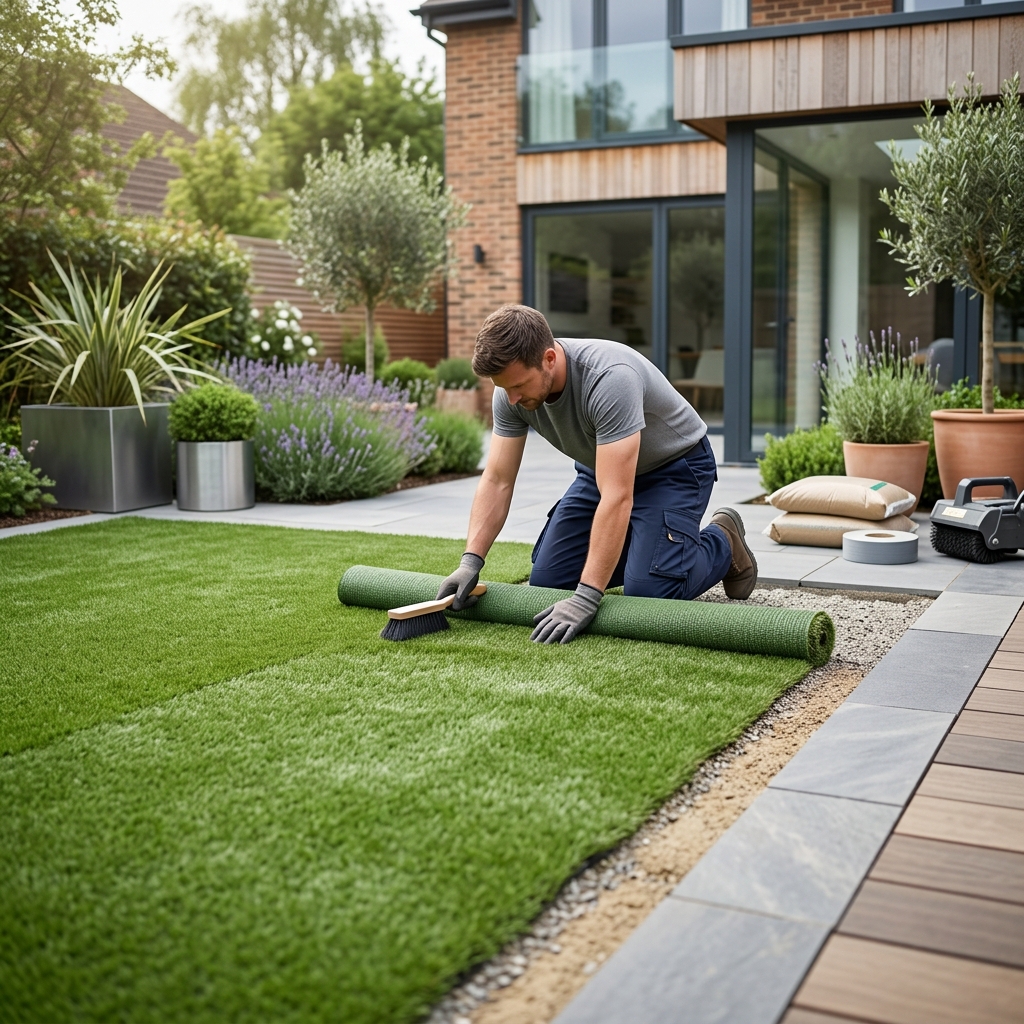
Step 3: Rolling Out and Cutting the Artificial Grass
Carefully unroll the artificial grass and allow it to settle for at least 24 hours in the sun. This helps to reduce any creases or wrinkles.
Accurately measure and cut the grass to fit the area, allowing for a slight overhang. Use a sharp utility knife and a straight edge. Pay attention to the nap of the grass – cut in the direction that keeps the fibres looking natural. Minimise waste by carefully planning your cuts.
Step 4: Joining the Artificial Grass Seams
If your lawn requires multiple sections of artificial grass, joining the seams is essential. Lay the sections side by side, ensuring a snug fit.
Apply joining tape underneath the seam, ensuring it adheres firmly to both sections of grass. Then, apply a line of adhesive along the seam on top of the tape. Use a rubber mallet to gently roll the seam together, ensuring a secure bond. Allow the adhesive to dry completely according to the manufacturer’s instructions. A well-executed join will be virtually invisible.
Step 5: Brushing and Finishing Touches
Once the adhesive is dry, brush the artificial grass pile using an artificial grass brush. This lifts the fibres and creates a natural-looking finish.
Adding infill (sand or rubber crumb) is optional, but it can help to stabilise the fibres, improve drainage, and provide extra cushioning. Follow the manufacturer’s recommendations for the amount of infill to use.
Finally, secure the edges of the grass using landscape staples or adhesive. This prevents the edges from lifting or moving.
Artificial Grass Maintenance
Artificial grass is incredibly low maintenance, but it still requires some attention. Regularly brush the grass to keep the fibres upright and remove any debris. Remove leaves, twigs, and other organic matter promptly. Rinse the grass occasionally with water to remove dust and dirt. If you’ve used infill, top it up as needed. Addressing potential issues like matting by brushing more frequently will maintain its appearance.
UK Regulations and Considerations (2026)
Currently (in 2026), there are generally no specific building regulations requiring planning permission for installing artificial grass in most residential gardens in the UK. However, it’s always best to check with your local council, particularly if you’re making significant changes to the ground level or drainage. Regarding waste disposal, any removed turf or excavated materials should be disposed of responsibly at a licensed waste disposal site. Check your local council’s website for information on waste collection and recycling services.
Artificial Grass Comparison Table (2026)
| Product | Pile Height (mm) | Price per sqm (£) | Pros | Cons |
|---|---|---|---|---|
| Rolawn Inspire | 20 | 28.99 | Durable, good for high traffic, affordable | Lower pile height may not feel as luxurious |
| Everlawn Premium | 30 | 35.99 | Excellent balance of softness and durability, realistic look | Slightly more expensive than lower pile options |
| Greensleeves | 40 | 42.99 | Very soft and comfortable, luxurious feel | May require more frequent brushing, less suitable for very high traffic |
FAQ
- How long will artificial grass last? With proper installation and maintenance, high-quality artificial grass can last 10-20 years or even longer.
- Is artificial grass permeable? Yes, when installed correctly with a suitable sub-base, artificial grass is permeable and allows for good drainage.
- Can I install artificial grass myself? Yes, many homeowners successfully install artificial grass themselves. However, it requires physical effort and attention to detail. If you’re unsure, consider hiring a professional installer.
- How do I clean artificial grass? Regular brushing and rinsing with water are usually sufficient. For stubborn stains, use a mild detergent and water.
- Is artificial grass safe for pets? Yes, most modern artificial grasses are designed to be pet-friendly, with excellent drainage and antibacterial properties.